The Layout of the String Keys
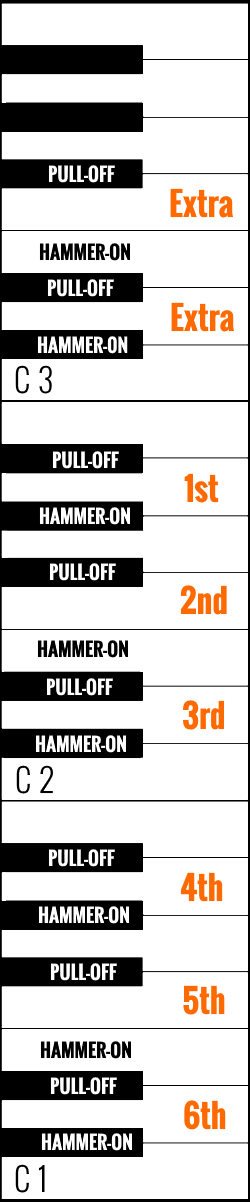
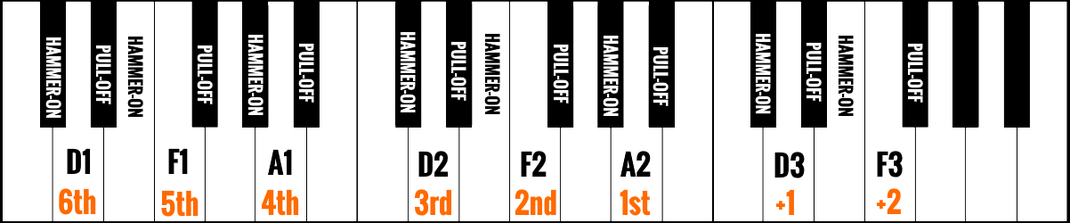
The keyboard interface in FingerpickPro is laid out in such a way as to give the central place to the six String Keys. When you trigger one of the Keyswitches on the bottom three octaves of the keyboard, the notes of that chord are ‘mapped’ to these String Keys.
These String Keys represent the six strings of the guitar:
A2 - 1st String
F2 - 2nd String
D2 - 3rd String
A1 - 4th String
F1 - 5th String
D1 - 6th String
*You will note on the diagram that there are two Extra 'String Keys' at D3 and F3. This is explained below. You will also note on the diagram that there are Hammer-On and Pull-Off keys. These are explained here.
*If you are on a phone or other device and this graphic is a bit hard to read, there is a vertical version of the graphic at the bottom of the page.
Learning to Use the String Keys
- To pick a pattern on the virtual FingerpickPro guitar simply trigger one of the keyswitches and play these six keys, either on a midi keyboard, or by putting midi notes into your DAW.
Triggering a Keyswitch
- When you trigger a keyswitch it remains operative until another keyswitch is triggered. So the midi note used to trigger the keyswitch only needs to be short, say, a one-eighth note. In other words, you do not have to extend this note for the length of the bar.
The Default Chord
- If you haven't selected a keyswitch yet it will play the default chord, which is the 'name' chord of the key instrument. For example, in the Key_A Instrument the 'name' chord is A major. The keyswitch for the default chord is C0 on the keyboard (in any of the Key Instruments).
An Example
For those who might be new at this kind of thing, let's work through a simple example.
- In your DAW create a midi ‘block’ of one bar in length. Then draw in the midi notes represented in the following graphic to create a very simple arpeggio on the top four strings:
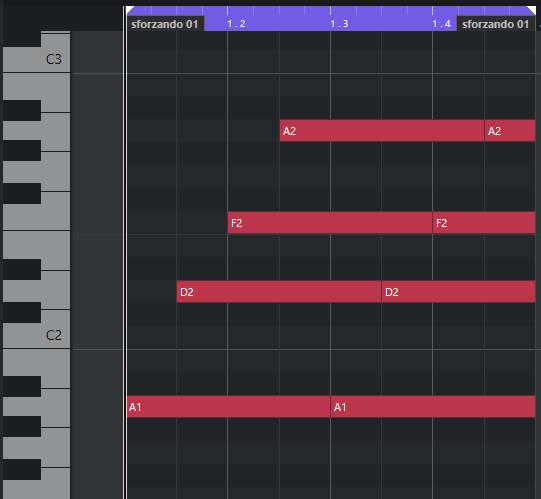
- Select the ‘Repeat’ option in playback and let the pattern play over and over.
- Now Duplicate this midi block say, four times, and extend the track range so that this four bar cycle will continue on Repeat Play.
- Now go through and select a different Chord Select Keyswitch for each bar.
- *Make sure you also put in a midi note in the first bar, in case you had forgotten and were relying on the default keyswitch. This is important because once you select other chords it will not automatically revert to the default chord.
- If you just select one chord at the beginning it will play that same chord for four (or however many) bars.
- Now as the picking pattern cycles through the four bars (or however many you want to put in) start experimenting with the pattern by changing the timing of the notes, and which strings are played in what order.
- Duplicate more bars and keep experimenting with different patterns and different chord keyswitches.

All Six Strings
- The standard voicing of chords as usually played on a real guitar will often not use all six strings. Often this is due to musical reasons, and sometimes due to the difficulty (or impossibility) of playing the resulting fingering that would be required. Sometimes it is just for simplicity.
- However, all the chords in FingerpickPro have notes on all six strings, even if in some cases they might be difficult to play on a real guitar. This has been done to avoid confusion, and to ensure that the All-Chord Midi File system will work predictably, and always sound a note on any string regardless of what chord it is.
- (It has also been done to ensure that the Auto-Bass Notes feature will always work predictably. This is explained here.)
- If you want to create recorded tracks using only chord/arrangements that could realistically have been played on an actual guitar, you can always adapt the arrangement you use accordingly. Just refer to the Chord Charts to help you decide which notes in particular chord voicings are not likely to be reasonably playable. This is especially the case if you intend to play these arrangements yourself on a real guitar, and need to ensure they are within your playing ability.
*For more on this see the Manual section on The Chords.
Extra String Keys
- Although the six String Keys are the main ordinary way of playing FingerpickPro, two additional ‘string keys’ have been added to make it possible to play higher pitched voicings of each chord.
- These extra 'string keys' don’t correspond to ‘strings’ strictly speaking, and they do not appear in the Chord Charts. These Chord Charts only show the ordinary open string/lower fret voicings of the chords.
- However, adding these higher notes means that you can construct some additional voicings of the chords so as to play at a higher pitch. To achieve this, the next two chord notes on the fretboard higher than those in the standard (Chord Chart) voicing are added, and these appear on the keyboard keys D3 and F3.
F3 - Extra 'String' 2
D3 - Extra 'String' 1
- These will usually be the next two chord notes higher on the 1st string. For example, in the C major chord, the standard voicing uses the open string E on the first string. This means the first Extra String Key (D3) will play the G note at Fret 3, and the second Extra String Key (F3) will play the C note at Fret 8. Other chords are arranged similarly.
- You don’t need to use any particular method to use these extra chord notes. You could simply use the top six of the eight string keys and leave out the lowest two. Or some other configuration. It’s up to your judgement as to what will work best.
*For more on this see the Manual section on The Chords.
Go to the next topic: Hammer-Ons and Pull-Offs >>>
Return to Manual >>>